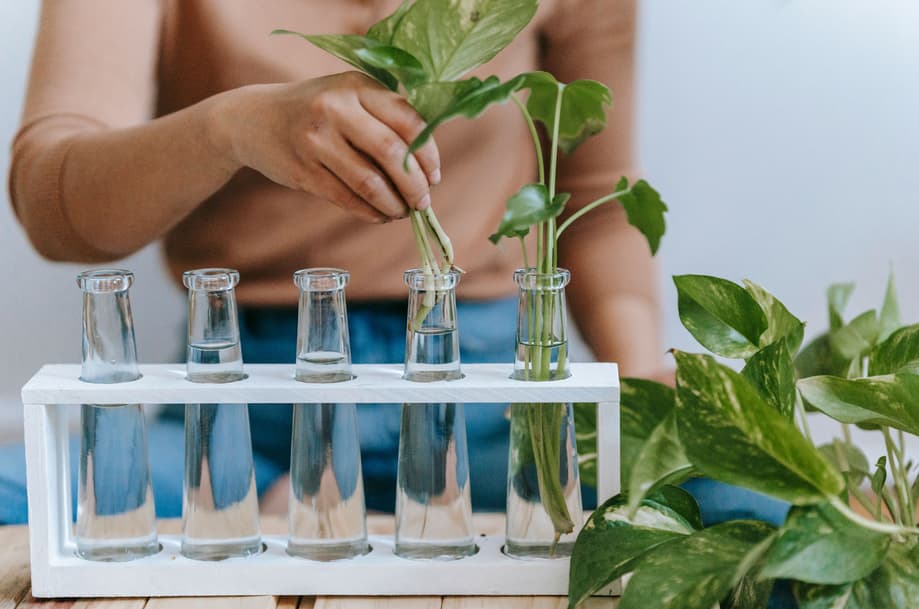
Want to grow more pothos plants without spending extra money? Learning how to propagate pothos in water is one of the easiest ways to turn a single plant into several new ones. All you need is a healthy pothos vine, clean scissors, and a glass of water. However, a successful cutting needs more than just water—it must include the right part of the stem to develop roots.
In this beginner-friendly, step-by-step guide, you’ll learn where to cut, how to encourage healthy root growth, how to prevent stem rot, and when your new pothos is ready for soil.
But if you’ve ever tried it only to watch your cuttings turn into a mushy, brown, rotting mess, you know it isn’t always as simple as it looks.
Most guides tell you to just “cut below a node and drop it in water.” This guide is different. We are going to dive into the micro-steps that commercial growers use to ensure a 100% success rate, prevent the dreaded water slime, and guarantee your cuttings survive the eventual move to soil.
- Once your pothos cuttings develop into established plants, learn how to fertilize indoor plants the right way to support healthy roots, stronger growth, and lush foliage without overfeeding.
The Secret Weapon: Understanding the Anatomy
Before making a single cut, you need to look for the root node. This is the secret weapon of pothos propagation.
Nodes are the small, brown, raised bumps located on the vine directly opposite where a leaf stems off. This is where the plant stores its concentrated growth hormones (auxins). If your cutting does not include a node, it will never grow roots. A leaf stem floating in water by itself will stay green for a few weeks, but it is a genetic dead end.
Equipment Checklist
• A healthy pothos plant (look for a vine with at least 4–6 leaves)
• Sterilized pruning shears or sharp scissors (rubbed down with isopropyl alcohol)
• A clean glass vessel (clear glass is best for beginners so you can monitor root health)
• Filtered or declorinated water (let tap water sit out for 24 hours to dissipate chlorine)
Step-by-Step: How to Cut Pothos for Successful Water Propagation
Getting the cutting right is the first step toward growing healthy pothos roots. Follow these simple steps to identify the right spot, make a clean cut, and prepare your stem cutting for water propagation. The key is to include at least one healthy node, because this is where new roots can develop.
Step 1: Isolate the “Active Zone”
Find a healthy vine on your mother plant. Avoid the very tip of the vine (where growth is too soft and prone to rotting) and avoid the woody base near the soil. Look for the middle section where the leaves are vibrant and firm.
Step 2: Cut for Single-Node Cuttings (The Pro Strategy)
Most beginners cut a long vine with 5 or 6 leaves and stick the whole thing in water. This forces the plant to waste energy maintaining a massive canopy of leaves instead of growing roots.
Instead, use the Single-Node Strategy:
• Locate a leaf and its corresponding brown node.
• Cut the vine 1/4 inch below the node, and 1/4 inch above the node.
• You will be left with a tiny segment of vine, one node, and one leaf.
Why this works: This architecture channels 100% of the cutting’s hormonal energy into a single root system, resulting in faster, and explosive growth.
Step 3: The 20-Minute Air Cure (Crucial for Slime Prevention)
Do not drop the cuttings straight into water. This is where most people fail.
Lay your fresh cuttings out on a paper towel for 20 to 30 minutes. This allows the raw, open wounds on the vine to “callus” or air-dry. Putting an open plant wound directly into water invites bacteria and fungi to enter, causing the stem to turn to mush.
Step 4: Submerge and Position
Fill your glass vessel with room-temperature water. Submerge the cutting so that the brown node is fully under water, but ensure the leaf remains completely out of the water. If a leaf is submerged, it will decay, deplete the oxygen in the water, and suffocate your developing roots.
The “Slime Prevention” Maintenance Protocol
Water contains dissolved oxygen that the new roots need to breathe. In a stagnant glass, that oxygen depletes within a few days, allowing anaerobic bacteria to take over.
• The 3-Day Flush: Flush and completely replace the water every 3 days. Do not just top it off.
• The Vessel Scrub: Every week, remove the cuttings and physically wash the inside of the glass with warm water to remove any microscopic biofilm (slime) building up on the glass walls.
• The Lighting Sweet Spot: Place your vessel in bright, indirect sunlight. Never place it in direct sun, which heats the water, cooks the nodes, and triggers massive green algae blooms.
Timeline: What Success Looks Like
• Days 1–7 (The Ghost Phase): Nothing seems to happen. The cutting is adjusting. Keep the water fresh.
• Days 7–14 (The Pip Phase): You will see the brown node split open and a tiny, white, fuzzy root tip emerge.
• Days 14–30 (The Extension Phase): The white root will rapidly shoot downward.
• Day 30+ (The Secondary Root Goal): Look closely at the main white root. You will start to see tiny horizontal “lateral roots” branching off the main root.
The 2-Inch Golden Rule: When to Transplant
The biggest trap in water propagation is leaving the plant in water for too long. Water roots are structurally different from soil roots—they are fragile, highly porous, and optimized to absorb liquid oxygen. The longer a plant stays in water, the harder it will be for it to adapt to soil.
The Golden Rule is to understand when your primary root is 2 inches long and has started growing secondary lateral roots, it is time to pot it in soil.
How to transition without shock:
1. Plant your new cuttings in a small pot (no larger than 4 inches) using a highly aerated mix of 70% potting soil and 30% perlite.
2. Keep the soil consistently moist (like a wrung-out sponge) for the first 10 days. Because the roots are used to pure water, bone-dry soil will shock and kill them immediately.
3. Gradually taper off your watering after two weeks until you are treating it like a normal pothos (watering only when the top 2 inches of soil are dry).
How to Use Your New Cuttings to Make the Mother Plant Bushier
If your original mother plant is looking leggy, sparse, or bare at the top, you can use your newly rooted water cuttings to completely transform its appearance.
In nature, pothos plants climb trees, which naturally keeps them dense. When grown indoors as trailing plants, gravity pulls their energy downward, causing long, stringy vines with fewer leaves near the soil.
Here is how to use your water-propagated clones to create a massive, bushy masterpiece:
1. The “Loop-Back” Planting Technique
Once your single-node cuttings have reached the 2-Inch Golden Rule (with healthy lateral roots), do not plant them in a brand-new pot. Instead, bring them back to the original mother plant.
• Poke 1-inch deep holes directly into the bare spots of the mother plant’s topsoil using a chopstick or your finger.
• Gently insert the roots of your new cuttings into these holes.
• Press the surrounding soil down firmly to ensure the new roots have secure contact with the dirt.
By planting 4 to 6 new cuttings directly into the top of the same pot, you instantly fill out the “bald” spots at the base of the plant, creating a thick, full canopy.
- For healthy pothos growth after propagation, choose the best soil for indoor plants to provide proper drainage and moisture balance. When your plant outgrows its container, learn how to repot indoor plants without damaging the roots to give them room to grow while minimizing transplant stress.
2. Double the Density: Triggering the “Apical Dominance” Hack
When you originally cut the vines off your mother plant to make these cuttings, you did something amazing to its genetics. You broke its apical dominance—the plant’s biological hormone command to only grow outward from the very tip of the vine.
Frequently Asked Questions
1. Can you propagate pothos in tap water?
Yes, but with one major caveat. Pothos cuttings are sensitive to the chlorine and heavy minerals found in standard city tap water, which can stunt early root development.
If you must use tap water, fill your container and let it sit uncovered on your counter for 24 hours. This allows the harmful chlorine gas to safely evaporate before you introduce your fragile cuttings.
2. Why are my water-propagated pothos leaves turning yellow?
If a leaf on your cutting turns yellow, it is usually caused by one of two issues: either the leaf stem is partially submerged under the water line (causing it to suffocate and decay), or the cutting is under intense stress because it was taken from an unhealthy, nutrient-deficient part of the mother plant.
If the node is still firm and green, clip off the yellow leaf and let the node continue rooting.
3. Do pothos cuttings need light to root in water?
Pothos cuttings need bright, indirect sunlight to successfully generate roots. While the roots themselves grow underground in nature and don’t need light, the attached leaf requires light to perform photosynthesis.
This process creates the vital sugars and energy the plant needs to push out new root growth. Keep them out of dark corners, but avoid direct sun, which will overheat the water.
4. Can I leave pothos in water permanently?
While a pothos can technically survive in water for months or even years, it will never truly thrive. Water lacks the critical macronutrients (like nitrogen, phosphorus, and potassium) found in soil.
Over time, a permanent water-dwelling pothos will develop smaller leaves, weaker stems, and eventually stop growing altogether. For a lush, trailing plant, soil is always the endgame.
Keep your pothos thriving as it grows by learning how to water indoor plants properly, avoid overwatering, and maintain the right moisture balance for healthy roots.
Conclusion
Mastering pothos propagation isn’t about luck; it’s about managing moisture, oxygen, and bacteria. By switching to the single-node method, letting your cuts callus over, and keeping a strict water-flushing routine, you eliminate the variables that cause most beginner setups to rot.
Take a look at your current pothos collection. Find a leggy vine, grab a clean pair of shears, and give this blueprint a try. Within a few short weeks, you’ll have a thriving, self-sustaining ecosystem of new growth ready to pot up, expand your indoor jungle, or gift to friends.
For fuller, healthier growth after propagation, explore these 13 pothos plant care secrets to help your new cuttings thrive and develop into lush, vibrant plants.

About the Author: Emebu Blessing Oghale
Emebu Blessing Oghale is an expert SEO content writer, digital creator, and indoor gardening enthusiast based in Asaba, Nigeria. Combining horticultural principles with years of digital media experience, he founded Indoor Plant Guide to provide practical, beginner-friendly troubleshooting tips for plant parents across West Africa and beyond. When he isn’t cultivating tropical houseplants, he serves his local community as a pastor at Living Faith Church.