
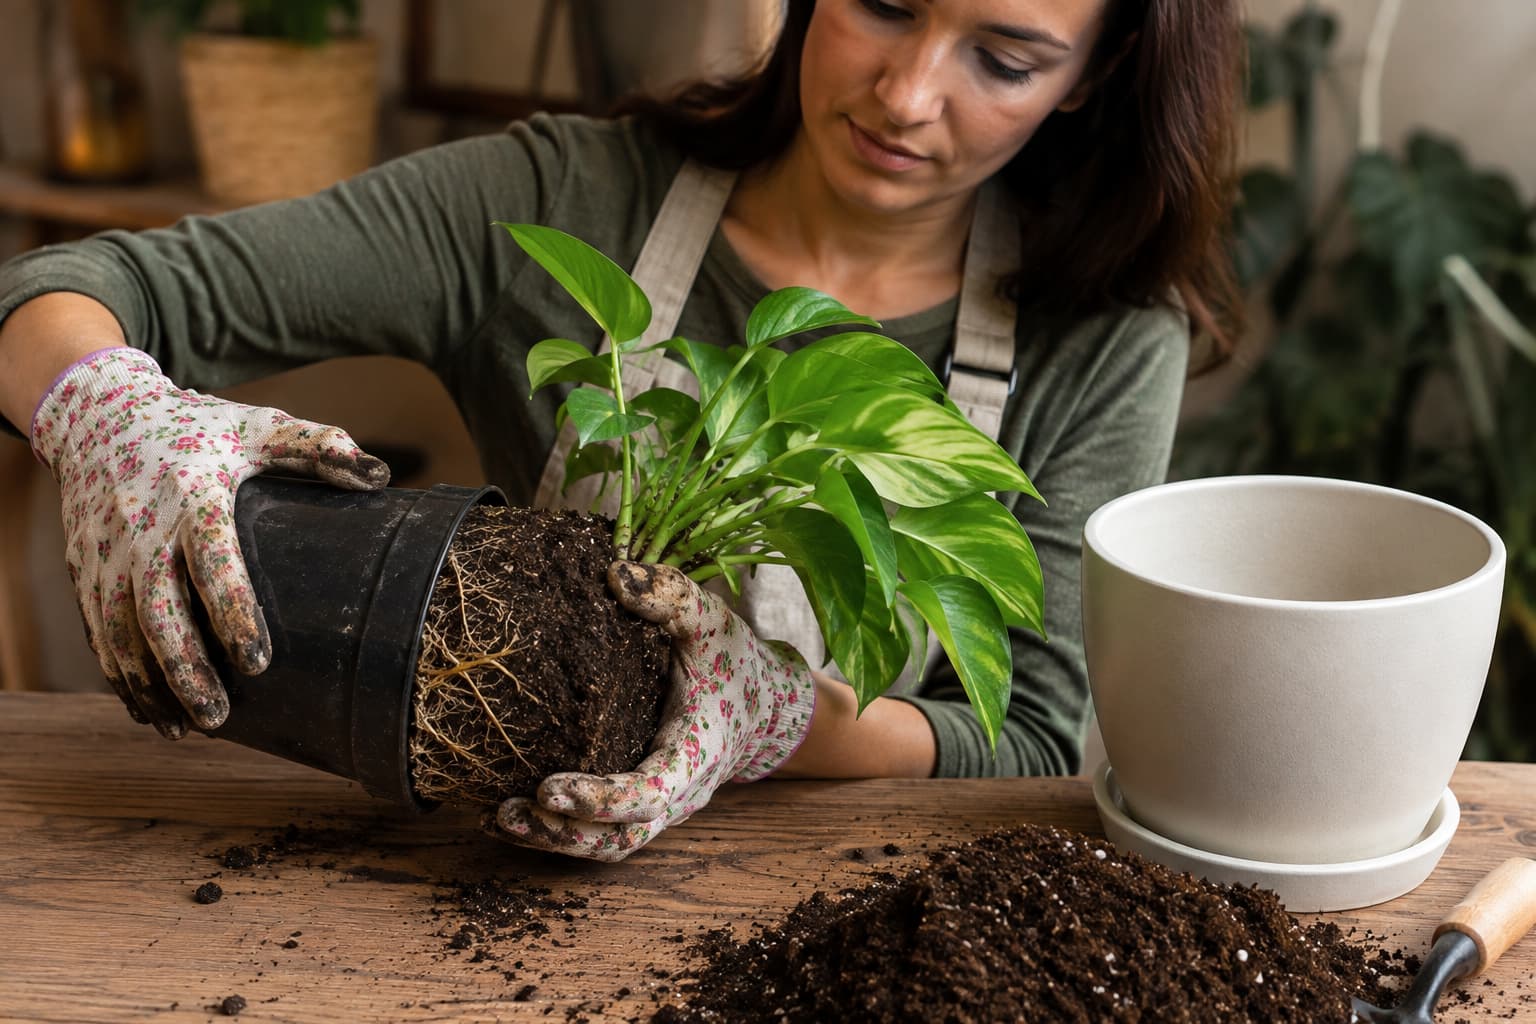
Repotting an indoor plant may seem simple, but learning how to repot indoor plants correctly can make the difference between helping your plant thrive and causing unnecessary stress. Many people assume repotting indoor plants only involves moving a plant into a larger pot with fresh soil, but the health of the root system is what truly determines success.
The challenge is that the most important part of any houseplant is hidden beneath the soil. Whether you’re learning how to repot a houseplant for the first time or figuring out how to repot a root-bound plant, it’s surprisingly easy to damage delicate roots by pulling apart the root ball, forcing the plant from its pot, or handling it too roughly. Root damage can leave a plant wilted, stressed, or slow to recover.
Related: Indoor Gardening for Beginners — A complete step-by-step guide covering plant selection, watering, lighting, soil, and essential care tips to help your houseplants thrive.
In this step-by-step guide, you’ll learn how to repot houseplants safely, how to repot plants without damaging roots, recognize when to repot indoor plants, and give your houseplants the best chance to establish healthy new growth after repotting.
The good news is that you usually don’t need to handle the roots aggressively. In most cases, successful repotting is less about removing every bit of old soil and more about creating enough room for healthy roots while disturbing them as little as necessary.
What Does Repotting an Indoor Plant Actually Do?
Repotting means removing a plant from its current container and placing it into fresh growing medium, a different container, or both.
Although people often associate repotting with moving a plant into a larger pot, that is only one form of repotting.
You may repot a plant because:
• its roots have filled the container
• roots are growing through drainage holes
• the potting mix has deteriorated
• drainage has become poor
• the plant has outgrown its container
• the existing pot is damaged
• the growing medium is inappropriate
• pests or root problems require replacing the medium
• you want to keep the plant in the same-sized pot while refreshing the mix
Container-grown plants have limited root space. Over time, growing media can also break down and lose some of its original structure, affecting drainage and air spaces around the roots.
However, repotting is not automatically necessary just because a plant has been in the same pot for a certain amount of time.
The plant’s roots and growing conditions are better indicators than the calendar.
How Do You Repot Indoor Plants Safely?
To repot an indoor plant without damaging its roots:
• Choose a suitable pot with drainage holes.
• Prepare fresh potting mix appropriate for the plant.
• Water the plant appropriately before repotting if the root ball is extremely dry.
• Remove the plant by supporting the root ball rather than pulling forcefully on stems or leaves.
• Inspect the roots for circling, congestion, rot, pests, or healthy new growth.
• Gently loosen severely circling roots rather than tearing the entire root ball apart.
• Remove only damaged or rotten roots when necessary.
• Place the plant at approximately the same depth it was previously growing.
• Fill around the root ball with fresh mix without compacting it excessively.
• Water thoroughly and allow excess water to drain.
• Return the plant to suitable light and give it time to recover.
The goal is not to completely clean the roots. The goal is to give the root system fresh growing space while minimizing unnecessary disturbance.
When Should You Repot an Indoor Plant?
There is no universal repotting schedule that works for every houseplant.
For instance, a fast-growing pathos in a warm, bright room may fill its container much sooner than a slow-growing plant kept in lower light.
Instead of repotting simply because a certain number of months or years have passed, inspect the plant.
Here are some signs your indoor plant may need repotting:
• roots emerging from drainage holes
• roots tightly circling the inside of the pot
• a root ball containing very little visible potting mix
• water running rapidly through the pot without adequately wetting the root ball
• the plant drying out unusually quickly
• noticeably slowed growth despite otherwise suitable care
• a container that has become unstable because the plant has become too large
• potting mix that has broken down or become excessively compacted
• roots that appear unhealthy when the plant is removed from its container
Penn State Extension recommends examining the roots when signs such as roots emerging from drainage holes or slowed growth suggest that a plant may have become pot-bound.
But don’t mistake every plant problem for a root problem
For example, yellow leaves, wilting, slow growth, or brown leaf edges do not automatically mean a plant needs a larger pot.
Those symptoms can also result from:
• inappropriate watering
• insufficient light
• pests
• temperature stress
• poor drainage
• nutrient problems
• damaged roots
• environmental changes
Repotting a stressed plant without identifying the underlying problem can sometimes make matters worse.
If your plant is struggling, diagnose the problem first rather than automatically moving it into a larger container.
Related: 21 common indoor plant problems and learn how to fix indoor plant problems fast, from yellow leaves and root rot to pests and poor growth, with simple, effective solutions.
What Is a Root-Bound Plant?
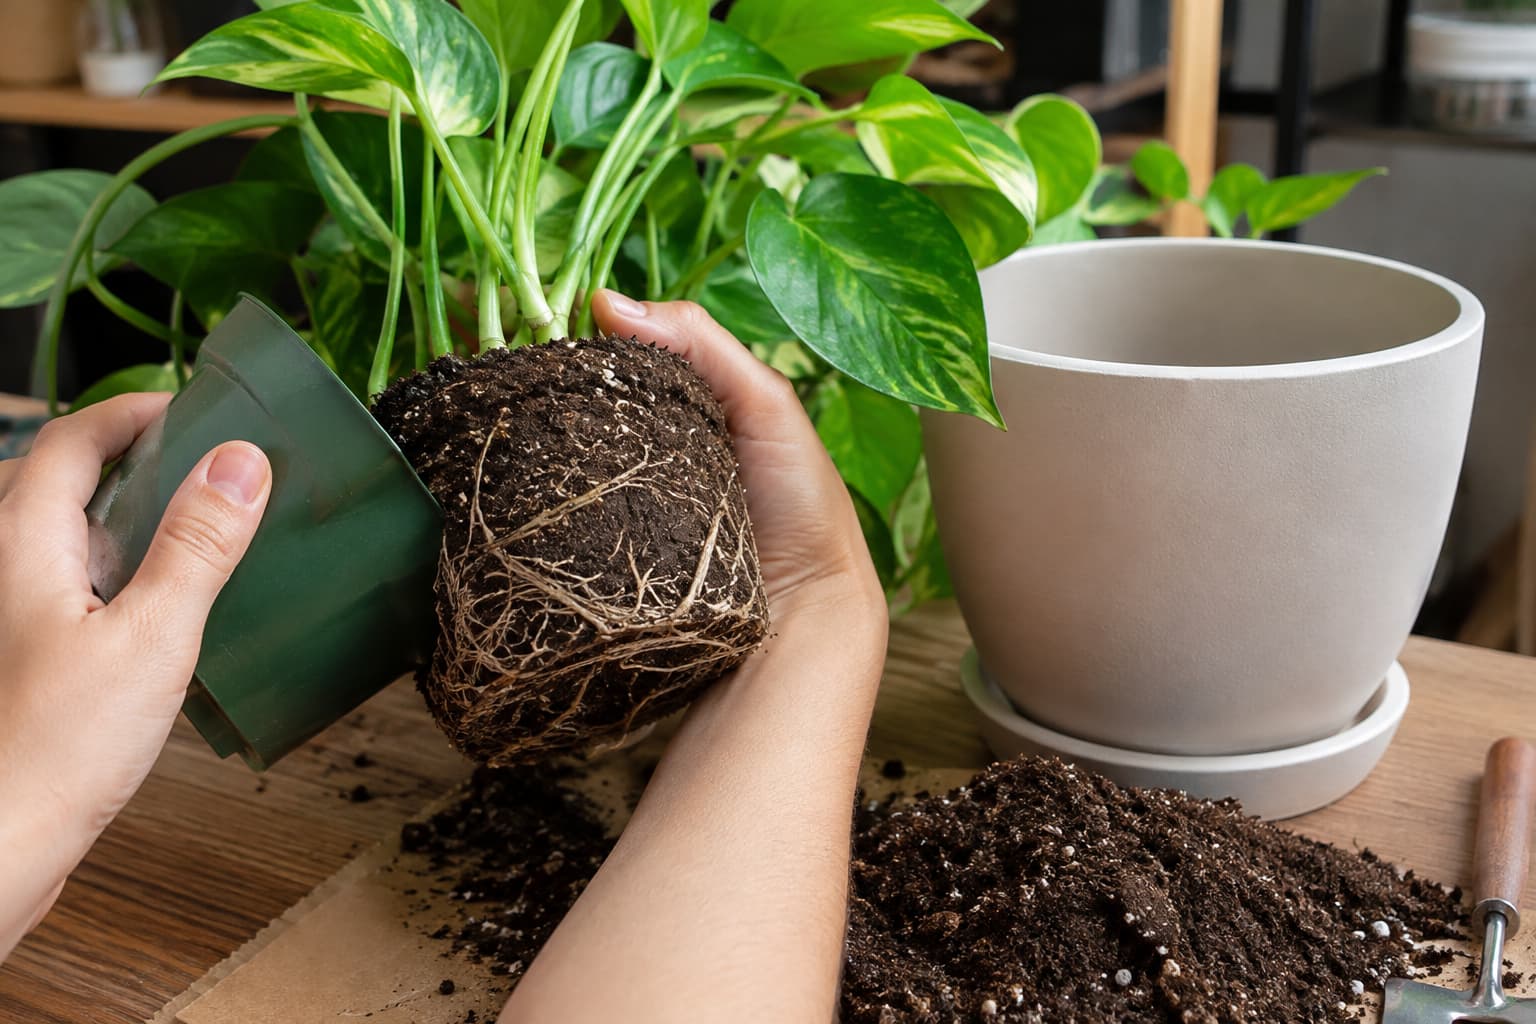
A root-bound or pot-bound plant has a root system that has become highly congested within its container.
Instead of spreading through the available growing medium, roots may form a dense network around the sides and bottom of the root ball.
Some plants tolerate this condition better than others, but severe root congestion can eventually interfere with water movement and healthy root growth.
What root-bound roots look like
When you remove the plant from its pot, you may see:
• roots circling repeatedly around the outside of the root ball
• thick layers of roots at the bottom
• roots emerging through drainage holes
• a dense, tightly packed root mass
• very little visible potting mix
• roots that have followed the shape of the container
Not every root circling the root ball is an emergency. A few circling roots are different from a root ball that has become densely matted.
The important question is how congested the root system has become.
When Is the Best Time to Repot Indoor Plants?
For many houseplants, the beginning of active growth is a good time to repot.
In temperate climates, this often means spring. The RHS identifies spring as a generally favorable time for repotting because plants are beginning active growth.
However, indoor plants do not all follow the same seasonal schedule.
Your home’s:
• temperature
• light level
• humidity
• plant species
• watering conditions
can influence growth.
Repot when necessary—not simply because it’s spring
Spring is a convenient time for routine repotting, but you should not ignore an urgent root problem simply because it isn’t spring.
For example, if a plant has severe root rot caused by persistently wet growing media, waiting months for a preferred season may not be appropriate.
Likewise, a healthy plant that is comfortable in its current container does not necessarily need to be repotted just because spring has arrived.
Think of timing as a risk-management decision rather than a rigid rule.
How Often Should Indoor Plants Be Repotted?
There is no single schedule for all houseplants.
The RHS notes that repotting frequency depends on factors such as plant vigor, growing medium, and container size.
Some vigorous plants may need attention relatively frequently, while slow-growing plants can remain in the same container for considerably longer.
Rather than asking:
“Has it been two years?”
ask:
“Does the root system still have enough healthy space, and is the growing medium still functioning properly?”
That question leads to a much better repotting decision.
What You Need Before Repotting
Gather everything before removing the plant from its container.
You will generally need:
• a clean container
• fresh potting mix
• a small scoop or trowel
• clean scissors or pruning shears if root pruning is necessary
• newspaper, a tray, or another work surface
• water
• gloves if preferred
If you are reusing a container, clean it thoroughly first.
This is especially important if the previous plant had root disease, pest problems, or other health issues.
Penn State Extension recommends cleaning previously used containers before repotting and provides a sanitizing approach using diluted bleach.
Step 1: Choose the Right New Pot
One of the most common repotting mistakes is choosing a container that is far too large.
A larger pot is not automatically better.
When a small root ball is surrounded by a large volume of moist growing medium, the plant may take longer to use that moisture. Depending on the potting mix, plant, and growing conditions, this can contribute to persistently wet conditions around the roots.
The University of Minnesota Extension recommends choosing a pot only about one size larger when repotting, noting that excessive extra soil can hold too much water and create root problems.
The RHS similarly recommends avoiding excessive increases in container size. Its general houseplant guidance suggests a pot around 5–10 cm larger in diameter for many houseplants, while its broader repotting guide recommends that a new container be no more than about one-third larger than the existing one.
A practical rule
For most ordinary houseplants, move up only modestly.
For example:
• 10 cm pot → approximately 12–13 cm
• 15 cm pot → approximately 17–18 cm
• 20 cm pot → approximately 22–25 cm
The exact size depends on the plant and root system.
The important principle is:
Choose enough room for continued root growth, not a huge reservoir of unused potting mix.
Step 2: Make Sure the New Pot Has Drainage
A container used for most indoor plants should have a functional drainage hole.
Drainage allows excess water to escape instead of remaining trapped around the root system.
This is particularly important for plants that are sensitive to consistently wet roots.
A decorative cover pot can still be useful, but if it has no drainage, use it as an outer container rather than relying on it as the plant’s primary growing container.
After watering, excess water should be able to leave the inner pot.
Don’t create a false drainage layer
You may have seen advice recommending a thick layer of gravel or stones at the bottom of a pot to improve drainage.
That isn’t a substitute for a drainage hole and appropriate potting mix.
Good drainage is primarily a function of:
• the container
• the growing medium
• the plant’s water requirements
• watering practices
Focus on those factors instead.
Step 3: Choose an Appropriate Potting Mix
Fresh potting mix should provide an appropriate balance of:
• moisture retention
• drainage
• aeration
• physical support
• nutrient availability
The ideal mix varies according to the plant.
A succulent, fern, orchid, aroid, and moisture-loving tropical plant should not automatically receive exactly the same growing medium.
For example, a plant that prefers excellent drainage may perform poorly in a dense mix that stays wet for long periods.
Choosing the best soil for indoor plants is one of the most important steps to growing healthy houseplants. The right potting mix for indoor plants provides proper drainage, aeration, and nutrients, helping roots thrive while preventing common problems like root rot and poor growth.
Step 4: Prepare the Plant
Before removing the plant, inspect it carefully.
Look at:
• leaves
• stems
• soil surface
• drainage holes
• overall plant stability
• signs of insects
• signs of disease
If you see pests, consider addressing the infestation rather than simply transferring the problem into a clean container.
Repotting can sometimes be useful when soil-dwelling pests are involved, but it should be part of an overall pest-management approach.
If the plant is severely dry and the root ball has shrunk away from the pot, handle it carefully. Extremely dry root balls can be fragile.
For a severely root-bound plant, preparation may also involve allowing the plant to become manageable enough to remove without excessive force.
Related Reading: Discover 21 common indoor plant problems and learn how to fix indoor plant problems fast, from yellow leaves and root rot to pests and poor growth, with simple, effective solutions.
Step 5: Remove the Plant Without Pulling on the Stems
This is one of the most important steps.
Do not yank the plant upward by its leaves or delicate stems.
Instead, support the plant and root ball while separating the container.
For a flexible plastic nursery pot, gently squeeze or flex the sides of the container.
If necessary:
• Tilt the container sideways.
• Support the plant near the base.
• Allow the root ball to slide out gradually.
• Work around the container rather than forcing the plant out.
For a small plant, you can place your hand over the surface of the potting mix while supporting the stem between your fingers, then carefully turn the container.
The RHS also recommends using the container’s shape and position to help release the root ball rather than simply forcing the plant upward.
If the plant refuses to come out
Don’t immediately pull harder.
Try:
• gently squeezing a flexible pot
• tapping the sides and bottom
• running a blunt tool around the inside edge
• carefully working the root ball loose
For a severely stuck plant, sacrificing an inexpensive plastic pot may be safer than tearing apart the root system.
With rigid containers, particularly those with a narrow opening, extra care may be necessary.
Step 6: Inspect the Root Ball
Once the plant is out, resist the temptation to immediately remove all the old potting mix.
First, look at the root system.
Healthy roots can vary in color depending on the species and growing medium, so color alone is not a reliable diagnosis.
Instead, consider:
• firmness
• texture
• smell
• density
• whether roots are actively circling
• whether roots are soft and deteriorating
• how much healthy growing medium remains
Signs of healthy roots
Healthy roots are generally firm rather than mushy or collapsing.
Depending on the species, they may be:
• white
• cream
• tan
• brown
• reddish
• another natural species-specific color
Do not automatically cut a root simply because it isn’t white.
Signs of unhealthy roots
Problematic roots may be:
• soft
• mushy
• collapsing
• unusually dark
• foul-smelling
• detached easily from the surrounding tissue
The Royal Horticultural Society (RHS) guidance recommends inspecting roots during repotting and removing soft, rotten roots when they are present.
Step 7: Decide How Much to Disturb the Roots
This is where many beginners go too far.
You generally do not need to completely strip the root ball.
If the plant is healthy and only mildly root-bound, preserve as much of the existing root ball as practical.
You may gently loosen the outer roots with your fingers if they are tightly circling.
The objective is to encourage roots to occupy the new growing medium without unnecessarily destroying functioning roots.
For mildly root-bound plants
Try this:
• Gently loosen a few outer roots.
• Separate obvious circling roots.
• Leave the central root ball largely intact.
• Place it into the new pot.
• For severely root-bound plants
A more substantial intervention may be necessary.
If the outer roots have formed a dense mat, gently work them apart.
If the plant is being returned to the same-sized container, some root pruning may be appropriate for certain plants.
The RHS notes that root pruning can be used when keeping a plant in the same-sized container, but the amount should be appropriate to the plant and situation.
Do not treat every houseplant as a bonsai.
Species vary greatly in their tolerance of root disturbance.
When you aren’t certain, a conservative approach is safer: preserve healthy roots and remove only what is clearly damaged or excessively congested.
Step 8: Remove Rotten Roots When Necessary
If you discover root rot, the goal changes.
You are no longer simply giving the plant more space.
You are removing unhealthy tissue and correcting the conditions that caused the problem.
Use clean, sharp scissors or pruning shears.
Cut away roots that are clearly:
• soft
• mushy
• collapsing
• dead
Avoid cutting healthy roots merely because they are darker than expected.
After dealing with rotten roots, the plant should be placed into fresh, appropriate growing medium and a container that is suitable for the remaining root system.
Most importantly, correct the environmental cause.
If the previous container stayed wet for too long because it was oversized, poorly drained, or watered too frequently, simply replacing the potting mix will not solve the underlying problem.
Step 9: Position the Plant at the Correct Depth
Place a layer of fresh potting mix into the bottom of the container.
Then position the root ball.
The plant should generally sit at approximately the same depth at which it was previously growing.
Avoid burying the stem or trunk deeply under fresh mix.
For many plants, the point where the stems meet the root system should remain near the surface rather than being buried under several centimeters of additional medium.
Why planting too deeply can be a problem
A deeper planting position can keep tissue that normally stays above the growing medium unnecessarily wet.
It can also change the way the plant receives support and air around its crown.
When in doubt, match the previous soil level rather than burying the plant deeper simply to make it look more secure.
Step 10: Fill Around the Root Ball
Once the plant is correctly positioned, add fresh potting mix around the sides.
Work gradually.
You can gently tap the container or lightly settle the mix into gaps.
Avoid aggressively packing the mix down.
Roots need access to both water and air, and excessive compaction can interfere with the physical structure of the growing medium.
Penn State Extension similarly recommends filling around the root ball while avoiding excessive compaction that could restrict water and air movement.
Leave enough space at the top of the pot to allow watering without immediately overflowing.
Step 11: Water Thoroughly After Repotting
After repotting, water the plant thoroughly.
The first watering helps settle the fresh growing medium around the root ball and ensures that moisture reaches throughout the container.
Water until some moisture drains from the bottom of the pot.
The RHS recommends thoroughly soaking the fresh growing medium after repotting and allowing water to drain through the container.
Then empty any water that remains trapped in an outer saucer or decorative container.
An important exception
If you have just removed substantial amounts of rotten roots or are dealing with a plant that is highly sensitive to excess moisture, your watering approach may need to be more cautious.
The correct approach depends on:
• plant species
• amount of root loss
• growing medium
• temperature
• light
• container size
The goal is to avoid both extremes: leaving the new medium completely dry and keeping a damaged root system continuously saturated.
Step 12: Give the Plant Time to Recover
A freshly repotted plant may not immediately look better.
Some temporary:
• drooping
• leaf loss
• slowed growth
• mild wilting
can occur after significant root disturbance.
That does not necessarily mean the repotting failed.
For the first several days, focus on stability rather than trying to force rapid growth.
Avoid making several major changes at once.
For example, immediately after repotting, don’t automatically:
• move the plant into dramatically brighter light
• fertilize heavily
• prune large amounts of foliage
• change its watering schedule repeatedly
• place it beside a heater or air conditioner
Give the plant appropriate light, stable temperatures, and sensible moisture.
Should You Fertilize Immediately After Repotting?
Usually, there is no need to rush.
Fresh commercial potting mixes may already contain nutrients, and the plant is adjusting to the disturbance.
Rather than treating fertilizer as a required part of repotting, follow the requirements of the specific plant and growing medium.
The bigger priority immediately after repotting is:
healthy roots + appropriate moisture + suitable light + stable conditions.
Once the plant resumes active growth, normal feeding can be resumed according to the species and growing medium.
Should You Water Before or After Repotting?
There is no single rule that applies perfectly to every plant.
The condition of the root ball matters.
If the plant is severely dry and the root ball is falling apart, some moisture may make handling easier.
If the plant has been excessively wet, adding more water before repotting may be unnecessary.
After repotting, thorough watering is commonly appropriate because it settles the new mix and ensures that the root ball and surrounding medium become hydrated.
After that initial watering, return to the plant’s normal watering requirements rather than watering on a fixed schedule.
Related: How to Water Indoor Plants Properly: Complete Beginner’s Guide — Learn how often to water indoor plants, the best watering methods for different houseplants, and how to avoid common watering mistakes that can lead to root rot or dehydration.
Can You Repot an Indoor Plant Without Moving It to a Bigger Pot?
Yes.
Repotting does not always mean “potting up.”
If a plant has reached the size you want, you can sometimes:
• remove it from the container
• inspect the roots
• refresh the growing medium
• lightly reduce excessive root congestion when appropriate
• return it to the same container
This is especially useful when the plant is already large enough for the available space.
However, root pruning is not appropriate to the same degree for every species.
For a healthy plant that isn’t severely root-bound, simply refreshing some of the growing medium may be enough.
When Should You Not Repot an Indoor Plant?
Sometimes the best repotting technique is not repotting at all.
Avoid unnecessary repotting when:
1. The plant is healthy and comfortable
If the plant is growing well, the pot drains properly, and the root system has adequate room, there may be no reason to disturb it.
2. The plant was recently repotted
Repeatedly disturbing the roots in a short period can create unnecessary stress.
3. The problem is actually insufficient light
A plant growing slowly because it receives inadequate light may not suddenly improve simply because it has a larger pot.
4. The plant is overwatered
Moving it into a huge container can create even more excess moisture.
5. You are trying to fix every problem simultaneously
If a plant is already stressed, unnecessary pruning, repotting, fertilizing, relocation, and watering changes can make diagnosis more difficult.
Address the most important problem first.
Common Repotting Mistakes That Damage Roots
Mistake 1: Pulling the plant out by the stem
This can damage stems and disturb the root system.
Better: support the root ball and loosen the container.
Mistake 2: Breaking apart every root
Healthy roots are valuable.
Better: disturb only what is necessary.
Mistake 3: Using a huge pot
A massive container can leave large quantities of growing medium around a relatively small root system.
Better: increase pot size gradually.
Mistake 4: Burying the plant deeper
Adding extra soil around the stem can create inappropriate moisture conditions.
Better: maintain approximately the previous planting depth.
Mistake 5: Compacting the potting mix
Hard packing can reduce air spaces.
Better: settle the mix gently.
Mistake 6: Ignoring drainage
A decorative container without adequate drainage can create persistent moisture problems.
Better: use a pot with a functional drainage hole.
Mistake 7: Removing all old soil automatically
Some beginners believe the roots must be completely exposed.
Better: preserve the root ball when there is no reason to strip it.
Mistake 8: Cutting roots just because they are brown
Root color varies among plants and growing conditions.
Better: assess texture and condition rather than color alone.
Mistake 9: Fertilizing heavily after repotting
More fertilizer does not necessarily mean faster recovery.
Better: allow the plant to stabilize and follow the requirements of the species and potting mix.
Mistake 10: Repotting according to a rigid calendar
A plant doesn’t become ready for repotting simply because a certain date has arrived.
Better: inspect the plant and root system.
A Simple Root-Damage Decision Guide
When you remove the plant, use this quick assessment.
| What You See | What To Do |
| Roots are healthy and only slightly crowded | Preserve the root ball and gently loosen the outer roots |
| A few roots circle the outside | Gently separate obvious circling roots |
| Roots completely fill the container | Carefully loosen the outer root mass and consider modest root pruning if appropriate |
| Roots are soft or mushy | Remove clearly rotten roots and correct the moisture problem |
| Roots look healthy and have plenty of space | Repot only if the growing medium or container needs attention |
| Plant is healthy but you want to maintain its current size | Refresh the mix and consider appropriate root pruning rather than moving to a much larger pot |
| Roots are badly damaged | Use a conservative container size and prioritize recovery over rapid growth |
What to Do After Repotting: The First Two Weeks
The period immediately after repotting is about stabilization.
Keep light appropriate
Don’t suddenly move a shade-tolerant plant into intense direct sunlight just because it has been repotted.
Likewise, don’t put a normally bright-light plant into a dark corner.
Maintain suitable lighting.
Monitor moisture
Don’t assume the plant needs water every day simply because it has fresh potting mix.
Check the medium and consider the plant’s species, container, temperature, and light.
Watch the leaves
Some temporary drooping can occur after root disturbance.
However, worsening symptoms deserve investigation.
Avoid unnecessary handling
Don’t repeatedly pull the plant out of the pot to check the roots.
Roots need time to establish.
Look for recovery
Depending on the plant and conditions, recovery may be indicated by:
• firmer foliage
• resumed growth
• new leaves
• improved stability
• normal water use
What If the Plant Wilts After Repotting?
Don’t panic immediately.
Some plants temporarily wilt because the root system has been disturbed.
But distinguish between normal transplant stress and a continuing root problem.
Possible reasons for temporary wilting:
• root disturbance
• damaged fine roots
• environmental change
• excessive heat
• insufficient moisture
• sudden change in light
Possible signs of a continuing problem:
• persistent worsening wilting
• foul-smelling medium
• soft roots
• rapidly yellowing foliage
• consistently saturated potting mix
• declining stems
If symptoms continue to worsen, reassess the root system and growing conditions rather than simply watering more.
How to Repot a Severely Root-Bound Indoor Plant
A severely root-bound plant requires more patience.
First, don’t attack the root ball immediately.
Inspect it.
If roots are tightly circling the outside, gently work through the outer layer with your fingers.
You may need to separate some roots individually.
If the plant is extremely congested, more extensive root work may be necessary.
However, the amount of root removal should depend on the plant.
The RHS notes that when plants are kept in the same container, light root pruning may be sufficient, while severely congested root balls may require a more substantial reduction carried out carefully over time.
For an unfamiliar plant, conservative root disturbance is generally preferable to aggressive cutting.
How to Repot an Indoor Plant With Root Rot
Root rot changes the procedure.
Instead of simply transferring the existing root ball into a larger pot:
• Remove the plant carefully.
• Inspect the entire root system.
• Identify clearly rotten roots.
• Remove damaged roots with clean tools.
• Discard heavily contaminated old growing medium where appropriate.
• Use a clean container.
• Choose an appropriate fresh growing medium.
• Avoid an oversized container.
• Correct the watering and drainage conditions that contributed to the problem.
The most important lesson is that root rot is usually a growing-condition problem, not merely a pot-size problem.
If the plant continues sitting in unsuitable moisture conditions, repotting alone won’t prevent the problem from returning.
Should You Repot a Plant Bought From a Nursery Immediately?
Not necessarily.
A newly purchased plant may already be in an appropriate container and growing medium.
Immediately repotting every new houseplant can create unnecessary root disturbance.
Instead, inspect it.
Ask:
• Is the plant healthy?
• Is the container badly damaged?
• Are roots severely congested?
• Is the growing medium unsuitable?
• Is drainage inadequate?
• Are there pests?
• Is the plant showing signs of serious root problems?
If none of these problems exists, allowing the plant to acclimate before repotting may be the less disruptive choice.
This is particularly useful when the plant has already experienced the stress of transportation and a new indoor environment.
How to Repot Different Types of Indoor Plants
The basic process is similar, but root handling should reflect the plant.
1. Pothos and Philodendrons
These can grow vigorously under favorable indoor conditions and may eventually fill their containers.
If the roots are crowded, gently loosen the outer root mass and move the plant into a moderately larger container.
Avoid unnecessarily tearing apart healthy roots.
2. Snake Plants
Snake plants have thick rhizomes and fleshy roots.
They can become crowded, but aggressive handling can damage their structures.
Use a well-draining growing medium and avoid oversized containers.
3. ZZ Plants
ZZ plants have thick underground rhizomes that store water.
Handle these carefully rather than treating them like a fine, fibrous root system.
A container that drains well is particularly important.
4. Peace Lilies
Peace lilies can become root-bound and may wilt when their root system or moisture conditions are disturbed.
Repot carefully and maintain appropriate moisture afterward.
5. Succulents
Succulents generally require a growing medium and watering approach suited to rapid drainage.
Avoid placing a small succulent root system into a very large pot filled with moisture-retaining mix.
6. Ferns and moisture-loving plants
These may have finer root systems and can require more delicate handling.
Their growing medium should reflect their particular moisture and aeration requirements.
The principle is simple: the repotting method should follow the plant, not the other way around.
Repotting vs. Refreshing the Top Layer of Potting Mix
Not every plant needs to be removed from its pot to receive fresh growing medium.
If the roots have adequate space and the main issue is an aging or depleted upper layer of potting mix, you may be able to remove some of the old surface material and replace it with fresh mix.
This is much less disruptive than a complete repot.
It can be particularly useful for large plants that are difficult to handle.
However, top-dressing cannot solve every problem.
It won’t correct:
• severe root congestion
• serious drainage problems
• rotten roots
• an unsuitable container
• heavily degraded growing medium throughout the root zone
Use it when the plant genuinely does not need a full repot.
How to Tell if Your New Pot Is Too Large
After repotting, look at the relationship between the root ball and the container.
A modest increase in size is generally easier to manage than a dramatic jump.
A warning sign is a small root ball sitting inside a disproportionately large container with a large amount of fresh growing medium surrounding it.
This is particularly important for plants that are sensitive to excessive moisture.
The University of Minnesota Extension specifically advises against moving into an excessively large container because extra soil can remain wet and contribute to root problems.
How to Repot Without Losing Soil From the Drainage Hole
If your pot has a large drainage opening, some potting mix may initially escape.
A small piece of mesh or similar breathable material can be placed over the opening if necessary.
The purpose is to reduce the loss of growing medium while still allowing water to escape.
Do not completely block the drainage hole.
The priority is always maintaining functional drainage.
A Beginner’s Repotting Checklist
Before you start:
• The plant actually needs repotting.
• The new pot has drainage.
• The new container is appropriately sized.
• Fresh potting mix is ready.
• Your tools are clean.
• You have a suitable workspace.
• You know the plant’s basic moisture requirements.
While repotting:
• Support the root ball.
• Don’t pull forcefully on the stem.
• Inspect the roots.
• Preserve healthy roots.
• Remove only clearly damaged roots.
• Gently loosen severe circling.
• Maintain the previous planting depth.
• Don’t compact the growing medium excessively.
After repotting:
• Water appropriately.
• Allow excess water to drain.
• Return the plant to suitable light.
• Avoid unnecessary fertilizer.
• Monitor moisture.
• Give the plant time to recover.
Related Post: 21 Best Low Light Indoor Plants for Beginners (Easy to Grow) — Discover 21 easy-to-grow low-light indoor plants that thrive in rooms with limited natural light, making them perfect for beginners, apartments, offices, and other low-light spaces.
Frequently Asked Questions (FAQs)
1. Do I need to remove all the old soil when repotting?
No. For a healthy plant, there is usually no reason to completely remove every particle of old growing medium. Preserving the existing root ball can reduce unnecessary disturbance.
More extensive removal may be appropriate when dealing with serious root problems, pests, or unsuitable growing media.
2. How much bigger should a new pot be?
Usually only modestly larger. A pot approximately one size larger is a useful starting point for many houseplants. The exact increase depends on the plant and root system. Excessive pot size can leave too much growing medium around the roots and increase the risk of prolonged wetness.
3. Should I loosen the roots when repotting?
Only as much as necessary. Mildly crowded roots may need little intervention. Severely circling or matted roots may benefit from careful loosening.
Don’t aggressively tear apart a healthy root ball simply because you think every root must point outward.
4. Should I cut the roots when repotting?
Not routinely. Remove clearly dead or rotten roots when necessary. More substantial root pruning can be appropriate for some plants when maintaining the same container size, but it should be done conservatively and with consideration for the species.
5. Can I repot an indoor plant while it is flowering?
It is usually preferable to avoid unnecessary root disturbance during demanding growth or flowering periods if the plant is otherwise healthy.
However, if there is an urgent problem such as severe root rot, waiting for flowering to finish may not be appropriate.
6. Why is my plant drooping after repotting?
Temporary drooping can result from root disturbance or environmental changes.
Check the moisture level, light, temperature, and condition of the roots. Avoid automatically watering repeatedly just because the leaves look wilted.
Related Reading: Master indoor plant care for beginners with this complete guide. Learn how to water, choose the right light and soil, fertilize properly, and care for your houseplants so they stay healthy, grow stronger, and thrive year-round.
7. Can I use the same pot after repotting?
Yes. If the plant is already the desired size, you can sometimes refresh the growing medium and carefully manage the roots rather than moving into a larger container.
8. Should I fertilize immediately after repotting?
Not automatically. Fresh potting mix may already contain nutrients, and the plant may need time to stabilize. Follow the requirements of the plant and the growing medium rather than treating fertilizer as a mandatory part of repotting.
9. What is the biggest mistake when repotting indoor plants?
For beginners, one of the most common mistakes is assuming that more space is always better. A huge container, excessive watering, aggressive root manipulation, or unnecessarily deep planting can create more problems than the original pot.
Good repotting is controlled, not dramatic.
The Main Principle: Disturb the Roots as Little as Necessary
Repotting should not be a battle between you and the root ball.
The healthiest approach is usually:
Inspect → assess → loosen only when needed → remove damaged roots → provide suitable space → stabilize the plant.
A healthy plant does not benefit from having its entire root system aggressively stripped apart simply because it is being moved into fresh potting mix.
At the same time, a severely root-bound or diseased plant may genuinely require more intervention.
Learning to distinguish between those situations is what makes repotting safer.
Your objective is not to create the biggest possible pot or the cleanest-looking root ball.
Your objective is to create a healthy environment in which the remaining roots can continue growing.
Conclusion
Knowing how to repot indoor plants safely comes down to understanding what the roots actually need.
Choose a container that is only moderately larger, use a suitable potting mix, maintain good drainage, support the root ball during removal, and avoid unnecessary root damage. Inspect the roots rather than automatically cutting or washing them clean.
For a healthy, mildly crowded plant, gentle handling is usually enough, and for a severely root-bound plant, carefully loosen the outer roots.
For a plant with root rot, remove clearly damaged tissue and correct the moisture and drainage conditions responsible for the problem.
Most importantly, don’t repot simply because a calendar says it’s time. Let the condition of the plant, roots, pot, and growing medium guide the decision.
With that approach, repotting becomes less stressful for both you and your plant—and much more likely to produce a healthy root system in its new growing environment.

About the Author: Emebu Blessing Oghale
Emebu Blessing Oghale is an expert SEO content writer, digital creator, and indoor gardening enthusiast based in Asaba, Nigeria. Combining horticultural principles with years of digital media experience, he founded Indoor Plant Guide to provide practical, beginner-friendly troubleshooting tips for plant parents across West Africa and beyond. When he isn’t cultivating tropical houseplants, he serves his local community as a pastor at Living Faith Church.
Hello Guider,
This is such a helpful guide, especially for beginners who are always worried about damaging the roots during repotting. I particularly like the step-by-step approach because it makes the whole process feel much less intimidating. The tips on knowing when to repot are also really useful. I’ll definitely keep these points in mind the next time I repot my indoor plants.
Hi Peter, thanks for stopping by and leaving a comment! Hope to see you again soon. 😊