Root rot can be frustrating because the first visible symptoms often appear above the soil while the real damage is happening below it. A houseplant may wilt, develop yellow leaves, stop growing, or look thirsty even though its potting mix is still wet.
The solution is not simply to water less. If roots have already begun to decay, the damaged tissue needs to be addressed and the conditions that allowed the problem to develop need to change.
The good news is that a plant with some healthy roots remaining can sometimes recover. The process involves confirming the problem, inspecting the root system, removing severely damaged tissue, replacing unsuitable growing media, and correcting the moisture and drainage conditions that contributed to the problem.
This guide explains how to fix root rot in houseplants step by step, including what to do with severely damaged roots, when repotting is necessary, and how to prevent another episode.
What Is Root Rot?
Root rot is a general term for diseases and disorders in which a plant’s root system deteriorates. Several soil-borne organisms can be involved, including species of Pythium, Phytophthora, Rhizoctonia, and Fusarium.
The problem is strongly associated with persistently wet growing media and poor aeration. When the root zone remains saturated, roots have less access to oxygen, creating stressful conditions in which susceptible roots can deteriorate and certain root-rotting organisms can thrive.
This is why simply blaming “too much water” can be an incomplete explanation. The issue is often a combination of watering frequency, pot size, drainage, growing medium, light, temperature, plant species, and how quickly the potting mix dries.
Root rot is also not a single disease with one universal treatment. Different pathogens can produce similar symptoms, and visual diagnosis alone cannot always identify the exact organism involved.
For ordinary houseplant care, however, the immediate priority is usually the same: stop the root zone from remaining excessively wet and preserve as much healthy root tissue as possible.
What Does Root Rot Look Like?
The symptoms above the soil can be confusing because several other houseplant problems can cause similar changes.
Common warning signs include:
• Wilting even though the potting mix is wet
• Yellowing leaves, particularly older leaves
• Stunted or unusually slow growth
• Progressive leaf loss
• General decline despite apparently regular watering
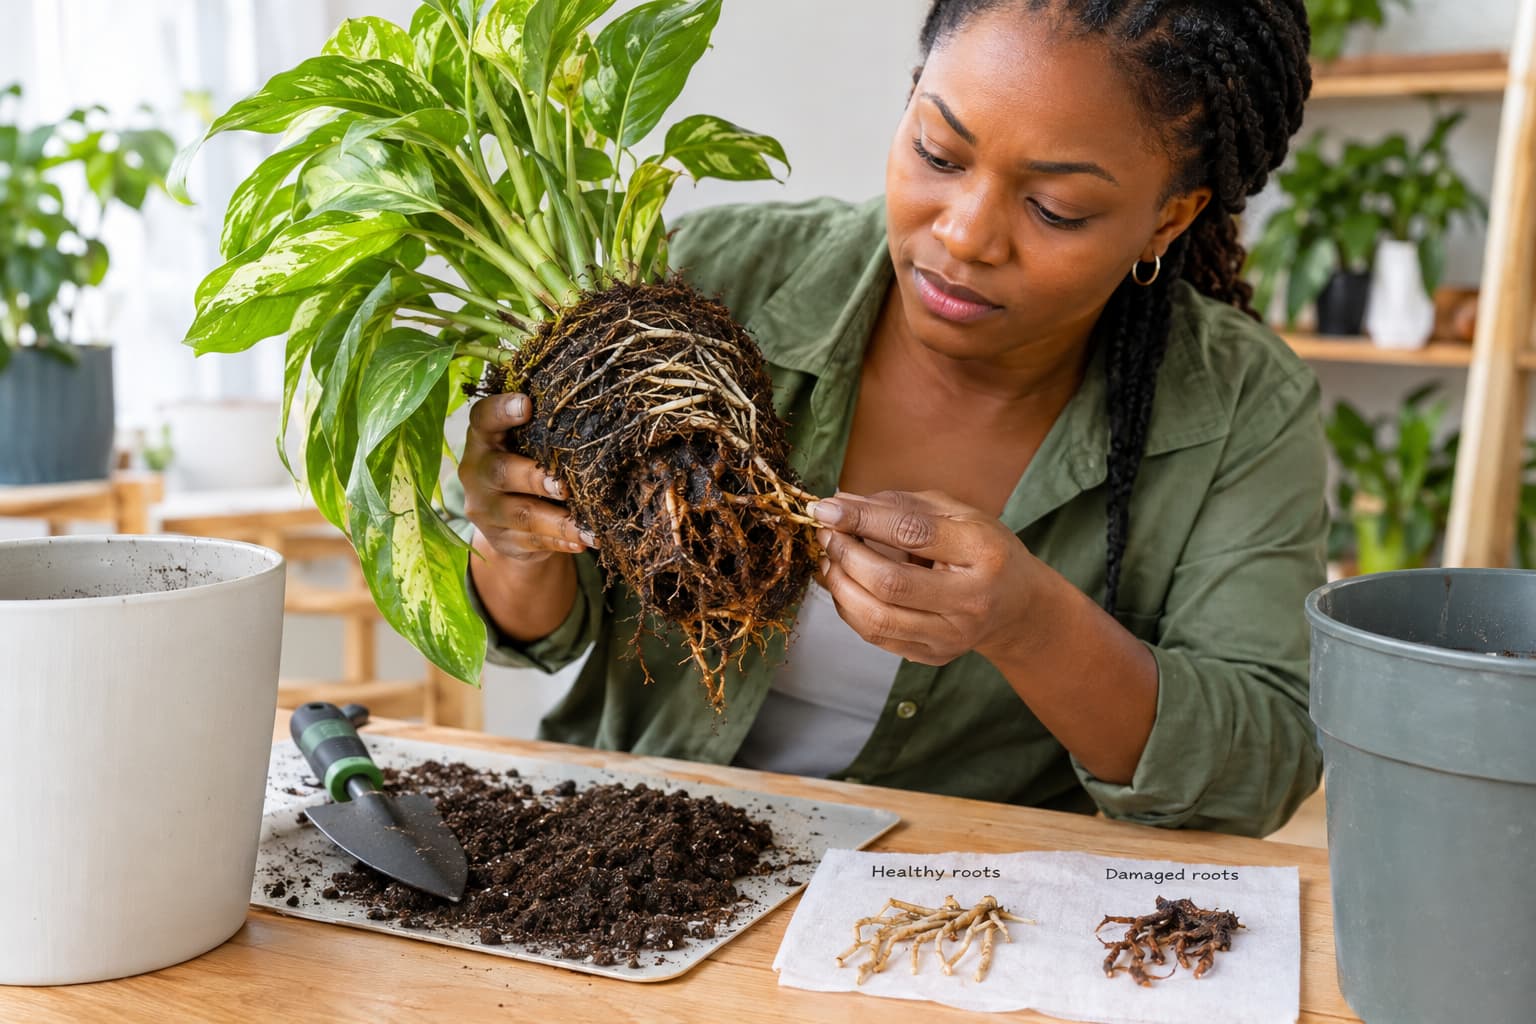
• Brown, black, soft, or mushy roots
• Roots that lose their outer tissue easily
• An unpleasant smell from severely decayed roots
One particularly useful clue is the combination of wet soil and persistent wilting.
A healthy root system needs both moisture and oxygen. When roots are badly damaged, the plant may be unable to take up water effectively even though plenty of moisture surrounds the remaining roots.
University extension guidance describes root-rot symptoms as including wilted or stunted plants and soft brown roots. However, similar symptoms can result from other problems, so checking the roots is important before deciding that root rot is responsible.
Healthy roots versus rotting roots
Healthy roots vary in color depending on the plant species and growing medium, so color alone is not enough for diagnosis.
Look at texture as well.
| Root Condition | What You May Notice |
| Healthy roots | Firm, resilient tissue appropriate to the plant |
| Stressed roots | Reduced root growth or discoloration without obvious decay |
| Rotten roots | Soft, mushy or collapsing tissue |
| Severely decayed roots | Tissue may slip away, leaving thin inner strands |
Some plants naturally have darker roots, so do not automatically cut every brown root. Texture, firmness, smell, and the overall condition of the plant provide more useful clues.
What Causes Root Rot in Houseplants?
Root rot usually develops when roots remain in unfavorable conditions for too long.
1. Overwatering
Overwatering does not simply mean giving a plant a large amount of water once.
The more important issue is whether the growing medium remains excessively wet between waterings.
Watering again while the root zone is still saturated can keep oxygen levels low and create conditions favorable to root problems.
Proper watering is essential for preventing root problems and keeping houseplants healthy. Learn How to Water Indoor Plants Properly: Complete Beginner’s Guide for practical tips.
2. Poor drainage
A pot without adequate drainage can trap excess water around the roots.
Even a careful watering routine may fail if water has nowhere to escape.
Always consider the entire drainage system: the container, drainage holes, potting medium, saucer, and decorative outer pot.
3. Heavy or unsuitable potting media
Some mixes retain excessive moisture and drain poorly in indoor containers.
Houseplants generally benefit from a growing medium designed for container culture rather than ordinary garden soil. The appropriate structure varies by plant, but the medium should provide a balance between water retention and air-filled pore space.
4. A pot that is too large
A large container contains more growing medium than a small root system can use.
That extra medium can remain wet for longer after watering, increasing the period during which roots are exposed to excessive moisture.
A larger pot is therefore not automatically better for a struggling plant.
Choosing the right pot can improve drainage, root health, and overall plant growth. Explore How to Choose the Right Pots for Indoor Plants: 9 Essential Tips for practical guidance.
5. Letting the plant sit in drainage water
Water collected in a saucer or decorative cachepot can keep the lower portion of the root zone saturated.
Empty excess water after watering rather than allowing the container to remain submerged.
6. Low light and slow drying
Light affects how quickly a plant grows and uses water.
A plant growing slowly in inadequate light may use less water than the same plant in stronger suitable light. If watering remains frequent, the growing medium can stay wet for too long.
This is one reason watering should be based on the plant and its growing conditions rather than an inflexible calendar.
Looking for plants that can handle limited sunlight? Explore 21 Best Low Light Indoor Plants for Beginners (Easy to Grow) to find beginner-friendly options for dim rooms.
7. Damaged or stressed roots
Roots damaged by rough handling, unsuitable temperatures, pests, compacted media, or other stresses may become more vulnerable to decay.
Root problems are therefore sometimes the result of several unfavorable conditions occurring together rather than one isolated mistake.
How to Fix Root Rot in Houseplants
If you suspect root rot, do not simply add more water because the leaves are wilting.
Follow these steps.
Step 1: Stop and assess the watering situation
Before doing anything else, check the potting mix.
If it is very wet and the plant is showing symptoms of decline, pause routine watering while you assess the root system.
Do not deliberately leave every plant bone-dry for an extended period, however. Different species have different moisture requirements, and a damaged plant can also suffer from drought stress.
The objective is to stop persistent saturation, not to replace overwatering with severe underwatering.
The type of water you use can affect plant health and growth. Learn more in Best Water for Houseplants: 5 Types Compared for Healthy Growth before choosing water for your indoor plants.
Step 2: Remove the plant from its container
Gently slide the plant from the pot.
If the root ball is extremely wet, work carefully because deteriorated roots can break easily.
Do not pull forcefully on the stem or foliage. Support the root ball and lower part of the plant while removing it.
If the roots are tightly attached to the inside of the container, loosen them gradually rather than tearing the root system apart.
Step 3: Examine the entire root system
This is the most important diagnostic step.
Gently remove enough potting mix to see the roots clearly.
You are looking for a combination of:
• Soft or mushy tissue
• Brown or blackened areas that are abnormal for the species
• Roots that collapse easily
• Outer root tissue that slips away
• A foul smell associated with decaying tissue
• A significant difference between damaged and firm roots
Do not assume every discolored root is rotten.
Some plants naturally have tan, brown, or otherwise darker roots. Firmness and tissue condition matter more than color by itself.
If the diagnosis remains uncertain, particularly when the plant is valuable, obtaining professional plant-disease diagnosis can be more reliable than treating an unknown problem.
Step 4: Remove severely damaged roots
Use a clean, sharp pair of scissors or pruning shears to remove roots that are clearly dead or decayed.
Cut back to tissue that is firm and healthy-looking rather than leaving obviously mushy sections attached to the root system.
Clean your cutting tool between plants, particularly if disease is suspected.
Do not aggressively remove every root simply because it is not white. The goal is to remove diseased or dead tissue while preserving viable roots that can support recovery.
Step 5: Remove the old contaminated potting mix
Once root rot is suspected, do not simply place the damaged root ball back into the same wet medium.
Remove the old growing medium from around the roots as carefully as practical.
Discard heavily contaminated or previously used potting mix rather than recycling it into another houseplant container.
This is especially important when several plants are being treated in the same area because soil-borne pathogens can potentially be moved through contaminated media, water, tools, and containers.
Step 6: Clean the container
If you intend to reuse the container, clean it thoroughly before repotting.
Remove old soil and plant debris first. Then sanitize the container using an appropriate disinfecting method.
Penn State Extension recommends cleaning and sanitizing used containers before repotting, while University of Wisconsin Extension also emphasizes sanitation of containers and tools when dealing with root-rot problems.
For porous containers that are difficult to clean adequately, replacement may be preferable if a severe disease problem is suspected.
Step 7: Choose fresh, appropriate potting mix
Use fresh commercial potting mix intended for container-grown plants.
Do not replace the old medium with ordinary garden soil.
The exact mix should reflect the plant. A tropical foliage plant, succulent, orchid, and African violet do not necessarily need the same growing medium.
The important principle is to provide a medium that supports the plant’s normal moisture requirements while allowing excess water to drain and adequate air to reach the roots.
Avoid trying to solve drainage problems by automatically adding a thick layer of gravel to the bottom of the pot. This commonly recommended technique does not improve the drainage of the entire root zone in the way many gardeners expect and can actually interfere with effective drainage.
Step 8: Use a container with drainage holes
The replacement container should allow excess water to escape.
If the existing container has suitable drainage and is still an appropriate size, you may not need to move the plant into a much larger pot.
In fact, choosing an unnecessarily large container can make moisture management more difficult because the additional growing medium may stay wet longer.
If the plant has lost a substantial portion of its root system, be especially cautious about moving it into a large container.
Step 9: Replant at the correct depth
Place the remaining healthy root system into the fresh potting mix.
Do not bury the stem or crown deeper than the plant normally grows.
Fill around the roots and gently settle the medium into place. Avoid compacting it so heavily that air and water movement become restricted.
The plant should be stable without being packed into an excessively dense root zone.
Repotting at the right time can protect root health and improve drainage. Follow How to Repot Indoor Plants Without Damaging the Roots (Step-by-Step Guide) for safe, practical steps.
Step 10: Let excess water drain completely
After repotting, water according to the plant’s requirements and allow excess water to drain freely.
Do not leave the container standing in a saucer full of water.
The appropriate amount and timing of water after repotting will depend on the plant, its remaining root system, the potting medium, light, temperature, and humidity.
The goal is a stable root environment, not continuous dryness.
Should You Cut Off All the Rotten Roots?
No.
Remove roots that are clearly dead or decayed, but preserve healthy roots whenever possible.
A plant with a small amount of viable root tissue has a better starting point for recovery than one that has had its entire root system unnecessarily stripped.
This is particularly important with plants that have naturally dark roots or thick, specialized roots. Root appearance varies considerably between species.
When in doubt, evaluate firmness and tissue integrity, not color alone.
What to Do After Treating Root Rot
The repotting is only the beginning.
The plant now needs conditions that allow the remaining roots to function and produce new growth.
1. Provide appropriate light
Give the plant the amount of light appropriate for its species.
Avoid moving a recently stressed plant abruptly into intense direct sunlight simply because you want it to recover faster.
At the same time, do not keep a plant in very poor light if its normal requirements call for brighter conditions.
The objective is to provide a suitable environment for recovery rather than adding another source of stress.
2. Adjust your watering routine
Do not return immediately to the watering schedule that contributed to the problem.
Instead, check the potting medium and consider the plant’s actual moisture requirements.
A succulent may need the medium to dry substantially between waterings, while a moisture-loving tropical plant may require more consistent moisture.
There is no single number of days that works for every houseplant.
3. Keep the pot draining freely
After every watering, excess water should have somewhere to go.
Check that the drainage hole has not become blocked by compacted potting mix or debris.
If the pot sits inside a decorative container, make sure water is not accumulating underneath it.
4. Do not fertilize heavily during immediate recovery
A severely damaged root system is not in a good position to support aggressive feeding.
Fresh potting mix may also contain nutrients, depending on the product.
Allow the plant to stabilize first, then resume fertilization according to the plant’s normal growth requirements and the instructions for the fertilizer being used.
5. Be patient with the foliage
Existing damaged leaves may not return to their former condition.
Yellow or badly damaged leaves can eventually die even after the root problem has been corrected.
Judge recovery by the overall trend rather than expecting every old leaf to improve.
New growth, stable stems, and a gradually healthier appearance are more useful signs that the plant is recovering.
How Long Does It Take a Houseplant to Recover From Root Rot?
There is no universal recovery period.
A plant with mild root damage and several healthy roots remaining may stabilize relatively quickly. A plant that has lost most of its root system may take much longer to produce noticeable recovery, and some severely affected plants will not survive.
Recovery depends on factors such as:
• Plant species
• Amount of healthy root tissue remaining
• Severity and duration of the problem
• Light levels
• Temperature
• Growing medium
• Container size
• Watering practices
• General plant health
Avoid repeatedly disturbing the roots to check for progress.
Once the plant has been properly treated, give it a stable environment and monitor the direction of change.
When Is a Houseplant Too Far Gone to Save?
Not every plant with root rot can be rescued.
The outlook becomes poorer when most of the root system has collapsed, the crown or lower stem is also badly decayed, or there is very little healthy tissue remaining to support new growth.
Iowa State University Extension and Outreach notes that discarding a severely affected houseplant can sometimes be the most practical option, particularly where there is extensive disease.
However, a plant should not be discarded merely because some roots are damaged.
If firm, healthy roots and viable stems remain, recovery may still be possible.
For rare or valuable plants, professional diagnosis may be worthwhile before giving up.
How to Prevent Root Rot From Coming Back
Treating the existing damage is only half the job. The long-term solution is to prevent the root zone from repeatedly becoming unfavorable.
Match watering to the plant
Do not water every houseplant on the same schedule.
Different plants have different moisture preferences, and those preferences can change with light, temperature, season, pot size, and growth rate.
Check the potting mix before watering
Use the condition of the growing medium as one piece of evidence.
For many houseplants, feeling the upper portion of the mix with a finger can help determine whether watering is appropriate. For plants with specialized moisture requirements, use a method suited to that plant.
Use appropriate containers
Choose containers with adequate drainage and avoid excessively large pots.
A decorative outer pot can still be used, but make sure the growing container can drain freely and that accumulated water is emptied.
Use the right growing medium
A quality commercial potting mix designed for houseplants is generally more appropriate than garden soil for indoor containers.
Specialized plants may require specialized mixes.
Give plants appropriate light
Light influences growth and water use.
If a plant is kept in conditions that are much darker than it prefers, its water use may decrease. Continuing to water heavily can leave the growing medium wet for too long.
Do not reuse questionable potting mix
If a plant has suffered a serious root-rot problem, do not automatically transfer its old potting mix to another plant.
Fresh growing media reduces the chance of carrying potentially harmful organisms into a new container.
Keep tools and work areas clean
Clean cutting tools after working on diseased or rotting plants.
This is particularly important when several houseplants are being handled during the same repotting session.
Do not rely on a calendar
A schedule such as “water every Sunday” may be convenient, but it does not account for changes in light, temperature, humidity, plant size, or seasonal growth.
Use the plant and its growing medium as your guide.
Low humidity can cause dry leaf edges and stress in many houseplants. Learn How to Increase Humidity for Indoor Plants: 10 Easy Methods That Work for practical solutions.
Common Mistakes That Make Root Rot Worse
1. Watering because the plant is wilting
Wilting does not always mean the plant needs more water.
A damaged root system may be unable to supply water to the foliage even while the potting mix is wet.
Check the root zone before adding more water.
2. Moving the plant into a much larger pot
A larger container does not automatically help a damaged plant.
Excess growing medium can remain wet around a reduced root system.
3. Keeping the old wet soil
If root rot is suspected, returning the plant to the same saturated medium defeats the purpose of treatment.
Change the conditions that allowed the problem to develop.
The right potting mix supports healthy roots, drainage, and moisture balance. Explore Best Soil for Indoor Plants, and How to Choose the Right Potting Mix for practical guidance.
4. Cutting every discolored root
Root color varies among plant species.
Cutting roots solely because they are brown can remove viable tissue unnecessarily.
5. Adding gravel to the bottom of the pot
A layer of gravel is not a substitute for an appropriate potting mix and drainage hole.
Focus on the container, growing medium, and watering practices instead.
6. Using fertilizer as a rescue treatment
Fertilizer does not replace damaged roots.
A struggling plant needs an appropriate root environment first. Feeding should be based on the plant’s needs and recovery stage rather than used as an emergency treatment.
Proper fertilization provides nutrients without unnecessarily stressing plant roots. Learn How to Fertilize Indoor Plants the Right Way (Step-by-Step Guide) for safe, practical feeding tips.
7. Assuming every case is fungal
“Root rot” describes a condition involving root deterioration and can have different causes. Similar symptoms can also result from watering errors, temperature stress, nutrient problems, root damage, or other diseases.
If the problem persists despite correcting moisture and drainage, consider obtaining a professional diagnosis rather than repeatedly applying treatments at random.
Wilting, yellow leaves, pests, and poor growth can signal underlying care problems. See 21 Common Indoor Plant Problems and How to Fix Them Fast for practical solutions.
A Simple Root-Rot Rescue Checklist
If you need a quick reference, use this sequence:
1. Stop routine watering temporarily: Assess how wet the growing medium actually is.
2. Remove the plant from the pot: Inspect the root system rather than relying only on leaf symptoms.
3. Identify clearly damaged roots: Look for soft, mushy or collapsing tissue.
4. Trim severely rotted tissue: Preserve firm, viable roots.
5. Remove old affected potting mix: Do not simply reuse saturated or questionable media.
6. Clean the container and tools: Reduce the chance of carrying disease into the new setup.
7. Repot with fresh, suitable mix: Use a container that drains properly.
8. Provide appropriate light: Avoid both extreme darkness and sudden harsh exposure.
9. Adjust watering: Water according to the plant’s moisture requirements and actual growing conditions.
10. Monitor recovery: Look for stabilization and new growth rather than expecting damaged leaves to become healthy again.
Can You Save a Plant With Root Rot Without Repotting?
Sometimes a very early moisture problem can improve simply by correcting watering and allowing the growing medium to dry appropriately.
But once roots are visibly rotten, especially when the potting mix remains excessively wet, simply waiting for the plant to recover in the same environment may not be enough.
Visible root damage gives you an opportunity to inspect what is happening below the soil and remove tissue that has already deteriorated.
For that reason, a plant with confirmed root rot generally deserves a root inspection rather than a blind change in watering alone.
What About Fungicides for Houseplant Root Rot?
Fungicides are not a universal answer to root rot.
Different organisms can cause root diseases, and a product that works against one pathogen may not work against another. Some products are also unsuitable for particular plants or indoor situations.
University of Florida IFAS Extension (Gardening Solutions) specifically cautions that chemical fungicides are generally not recommended as a routine solution for root rots in houseplants, partly because of limited availability and practical limitations for home growers.
If a valuable plant continues to decline despite correcting moisture, drainage, and sanitation, professional diagnosis can help determine whether a specific disease is involved and whether any treatment is appropriate.
Do not apply a pesticide or fungicide simply because a plant has yellow leaves and you suspect root rot.
Spider mites can quickly stress indoor plants by damaging leaves and sucking plant sap. Learn How to Get Rid of Spider Mites on Indoor Plants: A Beginner’s Guide for practical treatment steps.
Frequently Asked Questions (FAQs)
1. Can root rot spread from one houseplant to another?
Some root-rot organisms can be moved between plants through contaminated potting mix, water, tools, containers, or plant debris. That is why sanitation matters when handling an affected plant. Keep affected material away from healthy plants and avoid sharing contaminated growing media.
2. Can a houseplant grow new roots after root rot?
Yes, some plants can produce new roots after damaged tissue has been removed, provided enough viable plant tissue remains and the new root environment is suitable. The ability to regenerate roots varies considerably among species.
3. Should I put a root-rotted plant in direct sunlight to dry it out?
No. Drying the foliage rapidly with intense sunlight is not a reliable treatment for damaged roots. Provide the light appropriate for the species and focus on correcting the root-zone conditions.
4. Can root rot happen in a self-watering planter?
Yes. A self-watering system does not automatically prevent root problems. If the plant, growing medium, reservoir, or setup keeps the root zone wetter than that species can tolerate, root damage can still occur.
5. Can root rot affect plants growing in water?
Plants adapted to water culture have roots that function differently from roots growing in potting media. Problems can still develop when water becomes stagnant, oxygen availability is inadequate, or the plant is not suited to the system. Do not assume that growing a plant in water makes it immune to root deterioration.
6. Are brown roots always a sign of root rot?
No. Root color varies naturally among plant species and growing systems. Healthy roots can be tan, brownish, cream, or other colors. Softness, decay, loss of outer tissue, and overall root condition are more informative than color alone.
7. Can a plant recover if all of its roots have rotted?
A plant with no viable roots has a very poor chance of recovering as a conventional rooted plant. However, depending on the species, healthy stem or leaf material may sometimes be used for propagation. This is a different process from simply treating the original root system.
8. Does root rot always produce a bad smell?
No. A foul smell can accompany severe decay, but its absence does not rule out root rot. Examine the roots directly when symptoms and growing conditions suggest a root problem.
9. Can root rot occur even when I do not water frequently?
Yes. Watering frequency alone does not determine how wet the root zone stays. A large pot, dense medium, poor drainage, low light, cool conditions, or a plant with low water demand can all contribute to prolonged moisture between waterings.
10. Is root rot more common in newly repotted plants?
It can occur after repotting if the new container is substantially oversized, the medium retains excessive moisture, drainage is poor, or watering is not adjusted to the plant’s new conditions. Repotting itself does not cause root rot, but a poorly designed setup can create favorable conditions for it.
11. Should I quarantine a houseplant with suspected root rot?
If you suspect an infectious root disease rather than a simple watering mistake, separating the affected plant while you inspect and treat it is a sensible precaution. It also makes it easier to prevent contaminated soil, drainage water, tools, or plant debris from reaching other plants.
Conclusion
Root rot is easiest to manage when you stop treating visible wilting as a simple thirst problem and inspect what is happening below the soil. Understanding how root health, moisture, drainage, and growing conditions interact is essential for effective indoor plant care guide for beginners.
If the roots are genuinely decaying, remove the damaged tissue, replace unsuitable or contaminated growing media, use a container with adequate drainage, and correct the moisture conditions that caused the problem. Preserve healthy roots whenever possible rather than cutting indiscriminately. For evidence-based guidance on plant health and growing conditions, resources from Texas A&M AgriLife Extension, and the Royal Botanic Gardens (Kew) can provide useful horticultural background.
After treatment, resist the temptation to overcorrect. A recovering plant needs stable, species-appropriate light, moisture, airflow, and growing conditions. For broader guidance on maintaining healthy houseplants, see our Complete Guide to Indoor Plant Care for Beginners.
The most useful next step is simple: check the roots before you water again. That inspection can tell you far more about what your plant needs than the leaves alone.

I’m Bon (aka Guider), a dedicated indoor gardening writer and houseplant specialist with years of hands-on experience cultivating diverse indoor flora. I author comprehensive, data-backed guides designed to help beginners master indoor plant care, including advanced soil science, precise watering schedules, lighting optimization, and pest troubleshooting. To ensure the highest level of accuracy and editorial integrity, every article integrates practical horticulture principles with peer-reviewed research from university extension services, botanical institutions, and trusted horticultural organizations.